How It’s Made
Nov 29th, 2012 by townsp2
There are four different components to this design.
The Code:
#define value0 10 // Definition of analog values for various resistors
#define value1 135
#define value2 330
#define value3 780
#define value4 980
#define numrounds 9 // Number of rounds
int sensorValue[5]; // Initializes sensor values and sets the starting values to 0
char answer; // Holds Answer value
char input[5]; // Holds user input values
char i = 0; // Counting variable
char win = 0; // Win indicator
char points = 0; // Number of points
char light = 0; // Indicates how many users get answer right
char rounds = 0; // Rounds counter
void setup() {
pinMode(10, INPUT); // Declaration of all Input buttons
pinMode(11, INPUT);
pinMode(12, INPUT);
pinMode(13, OUTPUT); // Status LED
pinMode(0, OUTPUT); // Output LEDs for various uses
pinMode(1, OUTPUT);
pinMode(2, OUTPUT);
pinMode(3, OUTPUT);
pinMode(4, OUTPUT);
pinMode(5, OUTPUT);
pinMode(6, OUTPUT);
pinMode(7, OUTPUT);
pinMode(8, OUTPUT);
pinMode(9, OUTPUT);
}
void loop() { // Infinite loop
win = 0; // Set win indicator to LOW
answer = 0; // Set default answer (‘A’)
while(digitalRead(12) == LOW) // Wait for input button to be pressed
{
if (digitalRead(10) == HIGH) // If add button is pressed
answer = answer + 1; // Add 1 to answer (‘A’ -> ‘B’)
else if (digitalRead(11) == HIGH) // If minus button is pressed
{
answer = answer – 1; // Subtract 1 from answer
for(i=0; i<answer + 2; i++) // Turns off all LEDs
digitalWrite(i, LOW);
}
for (i=0; i<answer + 1; i++) // Turns on all LEDs based on answer
digitalWrite(i,HIGH);
delay(150); // Delay for bouncing and stability
}
for(i=0; i<10; i++) // Turn off all LEDs
{
digitalWrite(i, LOW);
}
digitalWrite(13, HIGH); // Turn on Status LED
delay(500);
digitalWrite(13, LOW); // Turn off Status LED
while (digitalRead(12) == LOW) // Wait for input button
{
// read the value from the sensor:
sensorValue[0] = analogRead(A0); // Read the resistor values
sensorValue[1] = analogRead(A1); // And convert to digital
sensorValue[2] = analogRead(A2);
sensorValue[3] = analogRead(A3);
sensorValue[4] = analogRead(A4);
for (i = 0; i<5; i++) { // Set input variables to match input resistance
//Put in Parsing code here
if (sensorValue[i] > (value0 – 50) && sensorValue[i] < (value0 + 50))
input[i] = 0;
else if (sensorValue[i] > (value1 – 50) && sensorValue[i] < (value1 + 50))
input[i] = 1;
else if (sensorValue[i] > (value2 – 50) && sensorValue[i] < (value2 + 50))
input[i] = 2;
else if (sensorValue[i] > (value3 – 50) && sensorValue[i] < (value3 + 50))
input[i] = 3;
else if (sensorValue[i] > (value4 – 50) && sensorValue[i] < (value4 + 50))
input[i] = 4;
}
delay(50);
}
for (i = 0; i<5; i++){ // Run for all inputs
if (input[i] == answer) // If the resistor input matches answer
{
digitalWrite(i, HIGH); // Set corresponding ‘right’ LED to HIGH
win = 1; // Set win indicator to HIGH
light++; // Add 1 to light indicator
}
else
{
digitalWrite(i+5, HIGH); // Set corresponding ‘wrong’ LED to HIGH
}
}
delay(500);
while(digitalRead(12) == LOW); // Wait for user to move on
for(i=0; i<10; i++) // Turn off all LEDs
{
digitalWrite(i, LOW);
}
if (light == 5) digitalWrite(13, HIGH); // If all users right, turn status LED on
if (win == 1) points++; // Add to the total amount of points
for(i = 0; i<points; i++) { // Turn on amount of LEDs corresponding to amount of points
digitalWrite(i, HIGH);
}
rounds++; // Add 1 to the amount of rounds played
if (rounds == numrounds) { // If all rounds have been played
rounds = 0; // Reset all values to default
points = 0;
digitalWrite(13, HIGH); // Turn on status LED on
}
delay(500);
while(digitalRead(12) == LOW); // Wait for user to continue
for(i=0; i<10; i++) // Turn off all LEDs
{
digitalWrite(i, LOW);
}
digitalWrite(13, LOW);
delay(500); // Delay for stability
}
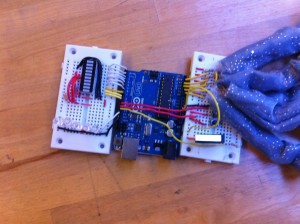
The Hardware: The hardware can be seen below.
The hardware is comprised of the LED’s, Analog Inputs, Pushbuttons, and the Arduino. The purpose of the hardware is to gather inputs and relay outputs.
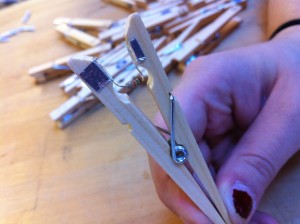
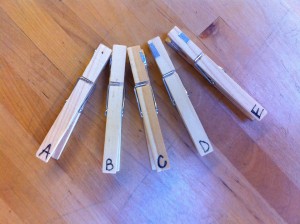
The Inputs: The inputs are clothespins. A resistor of different level is set into each letter (A, B, C, etc.), this way the hardware and code can detect if the answer is correct. Below are a few images of the clothes pins.


